After a break over the xmas holidays, I thought I'd share some pics from a one-off fight I'd had. At random, I decided to just put each full army on a big table and fight out a stand-alone battle. Normally I have been recently doing this on the floor of the living room, but the knees don't take well to it! Instead I broadened out the dining room table by the simple method of putting down some sheets of MDF board to widen it from a small-ish rectangle into a large square area - and then I crammed every bit of scenery I had onto it, to make the terrain as challenging as possible.
After a brief setup, I was off! Each army advanced from it's setup area, rapidly gravitating towards the defensive positions around - of which there were many. Below is the Luftberg army in it's deployment zone, about to occupy a small hill to its front.
Below we have the Aschenbach army, which has the space for a more linear setup to the front, and guns packed on a hilltop behind.
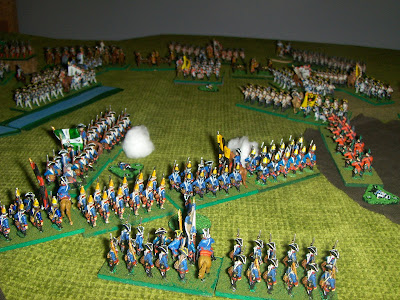
The battle opened with the speedy Aschenbach advance in the centre, between the two areas of woodland. The centre offered only a narrow corridor for advance between these obstacles, so brigades of infantry went through one after the other. The object for Aschenbach became to have the two leading line infantry brigades swing left and right, leaving the enemy centre set up for the third brigade (made up of Grenadiers) to break through. The terrain is tough however - a stream on the left, a hill to the right, and an enemy-held village right in the centre!
Disaster looms! The Aschenbach infantry cause terrible casualties, but by trying to swing out and widen their front, they expose their flanks to enfilade fire as the Luftberg line bends back and becomes concave! The bluecoats flee, and the Luftberg line begins to advance. With Croats also sniping from the trees, could this be a total collapse for the Aschenbach army?
The grenadiers occupy the gap between the two woods, and crush the Luftberg advance with their steady volleys. The advancing tide is turned back, with the possibility of breaking the Aschenbach army part now rapidly fading - those grenadiers have sealed up the bottleneck like, erm, a cork in a bottleneck!
Sensing a loss of Luftberg strength, the grenadiers advance out to press on the enemy line. Luftberg units prove equal to the chance with their supporting batteries however, and the Grenadier advance is held - also thanks to some pretty aggressive counter-charging by the lively Hungarians!
And so, with the see-saw infantry battle over, the battle peters out in a standstill. The cavalry on each flank maintained a watchful hold on each other, waiting for one side or the other to gain an advantage in the centre before attacking. Sadly, that never came decisively for either side. The ground in the centre was certainly torn up, with an Aschenbach advance, then a Luftberg one, then a second Aschenbach attack, followed by yet another Luftberg counter-attack. As it turned out, the grenadiers were battered enough to pull back and hold the line long enough for all the batteries of artillery to be lined up in a protective screen. Each army had lost heavily, but neither had prevailed. I suppose the Aschenbach King can simply go home dissatisfied, but the Luftberg General will have a job writing to his Emperor and spinning this as a victory!


7 comments:
Great eye candy, thanks...
Looks like fun; what rules did you use?
A rousing tabletop encounter. Well-done!
Best Regards,
Stokes
Nicely done! Two lovely little armies, and an adventure well told.
Thanks very much, everyone! I am planning to resume my campaign shortly, but it was nice in the meantime to have a one-off scrap!
Martin: the rules I am currently using are 'Black Powder' although in the past I have used DBA-adaptations and also 'Might & Reason.' I'd recommend them all, but at the moment I'm definitely a BP-fan!
It is actions like this: fiercely fought close encounters that has persuaded me that battles in real life, as well as on the table, are bally hard to win. At the same time they are extremely easy to lose! Great pics, and a stirring fight between two well-presented armies.
Craig,
Send me an email at jimw31 at cox dot net.
I have a jpg to send you for your WOTR "order" chit.
Jim
Post a Comment