Wednesday, July 30, 2008

Might And Reason

A slight digression here, as I've been asked now and again in comments about the rules I've been using - Might & Reason. I held off for my first try, but now with a second battle completed, I think I can at least list my thoughts about the rules' good and bad points. Here then, in no particular order, are the things that instantly occur:

M&R Positive Things
  • Command inertia - the rules are good (especially if you have recurring characters) for modelling individual commanders and their foibles. They also reflect that an army like the Austrians is slow to move and react, while the Prussians are fast and mobile. Each really does have to be handled differently, to avoid disaster.
  • The rules thenselves are extremely slick and professional, full of nice touches such as army lists, campaign rules, pictures, and even little quotes to improve the period flavour. I know this is down to personal taste, but I like the fact that the rules are clearly being backed by somebody who actively enjoys the hobby. And of course, thanks to the internet, this means that you'll have a supporting website with updates, scenarios, etc.
    Slick – campaign, lists, etc.
  • The rules are, at their heart, simple and straightforward. Distances are in basewidths, combat only requires a few dice rolls without consulting tables for results, and (in perhaps the ultimate test,) somebody like me who has been playing DBA games for ages didn't find it a struggle to suddenly handle extra complexity.
  • It fundamentally 'works' in terms of playing out realistically. Infantry lines grind against each other, combats ebb and flow, and cavalry battles see-saw backwards and forwards.

M&R Negative Things

  • Lots of dice seem to be needed, mostly D6 but also including a D4. I've built up quite a collection over time, but newcomers may find themselves running low.
  • Command checks are constantly retaken to see if units become inactive, but rolling 2D6 for each command, each turn, could quickly become wearing in a large battle. The system gets good results, but other games model command breakdowns much more smoothly and with less fuss.
  • The flow of play feels strange (perhaps through unfamiliarity at this stage). The usual rhythm of move-fire-combat, move-fire-combat doesn't happen, and is instead fire-move-combat-move-combat, fire move combat, move combat. Firing seems to happen less than combat, which can be frustrating to a 'shooty' army like the Prussians or British. The game uses a variable turn length (which is nice), but is also structured to have pulses within turns, and phases within pulses (or possibly the other way around). I have to use a flow-chart with a marker, just to keep track of who's move it is, and I don't think this'll change with familiarity.
  • Organising is required. It's not like DBA, where you think "I'll have a quick battle". You need to roll for sub-commanders, organise commands, and generally put in some time with a bit of paper and a pencil before any clash. Less of an issue once you're set up for a campaign, though.
  • Information - units work by strength points, so end up with labels for things like name, unit type, strength points, and possibly also their command in a big game. This means you'd better not want your tabletop covered in miniatures and nothing else - labels, markers, dice-stacks, - they're all appearing.

That's my initial off-the-top-of-the-head thoughts. I'd be interested to hear if anybody else out there has a set of M&R (or some other rules set) they've any thoughts about.

Cheers!

CWT

Tuesday, July 29, 2008

The further adventures of Gerdt von Krumper

Following his defeat, the Prinzregent von Krumper has been responding like any sensible general - locking himself away in the nearest requisitioned mansion, proclaiming the entire house of Krumper to be doomed, and passing listless days stretched out on a chaise-longue reading over-wrought French poetry. Still, after such necessary self-indulgence, it's time to pull himself together and look at the damage...

How does the campaign map shape up now? Well, there's no denying that the campaign has been (perhaps through inexperience) running at a rather ahistorical intensity (or perhaps not, and I'm just being naive.) Anyway, the fact is that after two months in this of the five-month campaign season, each side has been spectacularly depleted. From attrition, supply losses, desertion and battle casualties, the Aschenbach army has lost about half it's strength while the Luftberg army has lost about a third of it's.

After Vogelhof, the Luftberg army moved back onto the main road to Flussburg, and began closing on the capital. Von Krumper had regained his equilibrium by this point, and marched back to Flussburg, initially intending to fight it out for the city in a defensive battle. The Aschenbach army was a sorry sight for the residents of Flussburg - it had marched out in top condition barely two months earlier, now returned by the same road at half strength and with the enemy hot on it's heels. However, a further look at the army's dwindling strength decided Gerdt von Krumper against a heroic stand and he evaded the Luftberg army, swinging south. The army was too depleted to leave any units behind, so the local militias and garrison troops will have to stand the siege.

Von Krumper pondered letting von Kleintrink ride off with the cavalry to rout the enemy Hussar detatchment under general Van Der Dijk, but decided against it for the time being as they were already operating too far from their depots to last. The Aschenbach army headed southeast, occupying a central-southern position and re-establishing it's supply lines. The Luftberg army may be besieging the capital, but the Aschenbach army was now in striking range of both their supply lines over the river and their raiding detatchment in the west.

It's a clear sign of von Krumper's intention to keep the fight going, and presents the Elector von Luftberg with a few problems for his own response - of which more later...

Saturday, July 26, 2008

Thoughts on Vogelhof

The victor, Von Luftberg watches the blue tide ebb away


So, a disastrous defeat for the Aschenbach army, which had seemed so invincible the year before! From the losers’ perspective again, what went wrong? Despite all the advantages in firepower, the main infantry lines proved pretty much equal in terms of damage inflicted. Clearly the cannons made a big difference to this, but I also think a big advantage came from the secure Luftberg position. With no flanks to turn, no units had to manoeuvre around or struggle to come to grips with the enemy. If the Aschenbach infantry had been able to hit a part of the line with their full force, the frequently inert Luftberg generals would have really struggled to respond. As it was, when the generals kept on failing command tests and becoming ‘inert’ it barely mattered as all they had to do was stay immobile and keep firing.

Although it won’t show through in my account, there was a definite improvement in handling the game mechanics (it seems my summary reference sheet does work!) Von Krumper got the initiative for the initial musketry firefights, but he regularly finished turns with handfuls of unused command dice (or CD’s, which commanders can use to re-roll critical tests). Elector von Luftberg however, with fewer command dice, always managed to use them all. It was by liberally spending CD’s that he managed to get his reserve cavalry to so effectively block the flanking moves, plus some excellent wins of the initiative which gave him double-moves to pounce on undeployed rivals. Perhaps it was down to the higher innate quality of the Aschenbach commanders, which made spending CD’s seem unnecessary. Luftberg, by contrast, had no doubts he needed to use his.

One last thing needs to be pointed out regarding Aschenbach’s performance, which is this: what if the two flank attempts had been switched? What if von Kleintrink had been sent to flank over the river, while General Kress and his grenadiers had been deployed in front of Vogelhof? The faster-moving cavalry could have travelled deeper into the rear and crossed the stream in a single move with their better movement rates, so they would have been fighting in the open and properly deployed. Similarly, the village of Vogelhof could plausibly have been stormed by the grenadiers, turning the infantry’s flank. As it was, the cavalry were useless on the flank and had nothing to do but a daring redeployment which would have led to disaster but for von Kleintrink’s personal modifiers.

It’s a sorry force that limps away from this defeat, but soon thoughts will have to turn to the next phase – how does this effect the campaign?

Vogelhof Part 2

Hearing the thunder of cannonfire and musketry from over the stream, General von Kress rushed his detachment onwards into the enemy rear. It soon proved problematic to keep pace with the guns, which were quickly left behind. On approaching the bridge, the dragoons quickly located the Croats of IR6 Karlovic in the woods covering the approach. For the heavy cavalrymen, the woods were too awkward a prospect in the face of the irregulars – only the infantry could turn them out. Von Kress couldn’t take the delay however, as the battle was already well underway and the idea of wasting time using guardsmen and grenadiers to chase off some half-civilised rabble through the woods was clearly not an option. Instead, he ordered his columns to turn east and ford the river in front of the woods, short of the proper crossing point.


Even grenadiers dislike getting water in their shoes, it appears

The dragoons of DR1 von Fleiger successfully crossed over to cover the infantry columns’ transit, but the move brought them too close to the Luftberg cavalry of General Frundsberg. This general, remarkably independent for a Luftberg commander, immediately saw the opportunity and fell on them with his entire force. Through speedy movement, the Aschenbach dragoons were still ordering themselves on the far bank when regiments of enemy cavalry suddenly rode over the hill and swooped down on them. Outflanked and caught unprepared, they were scattered by Colonel Schrodinger’s Cuirassiers KR2. Flushed with success, the cuirassiers tore on into the stream, descending on the astonished Foot guard IR1.

IR1 Foot Guards has it's day totally ruined

Caught in marching column half-way through fording a river, the elite infantry regiment was scattered in confusion. The Hirschburgers managed to stabilise things by holding the far bank, but all hopes of the planned outflanking were at an end.

The Aschenbach line, bent back on it's right around Vogelhof

In the main battle, the firing reached a new intensity as each side blazed away, with regiments charging into each other and steadily losing strength in the storm of musket balls and canister. Von Zaub himself waded in at the head of von Klink’s IR2, but couldn’t decide the issue. Clearly stalemate had been reached. What of the improvised outflanking by von Kleintrink – could he once again work a miracle?

The fighting grinds on

For one ideal moment, it all seemed to be going so well as Kleintrink passed the rough ground

Sadly, it was not to be. The reserve Luftberg cavalry under General Kohl rushed to intercept, and the normally dependable von Kleintrink found himself being caught before he had room to deploy. Caught at a disadvantage, KR2 von Kurbitz was routed, but von Kleintrink himself put in a heroic turn, personally leading KR1 von Schnitzel’s troopers in seeing off the enemy horsemen (and very nearly getting killed into the bargain).

Disaster! Von Kleintrink is caught before he can deploy

However, despite his charmed personal efforts there was no escaping it – the enemy horse had stalled his efforts to turn the flank, and they were both forced to back off and glare at each other. That damnable General Kohl even had the effrontery to cheerfully promenade up and down on the hilltop behind his men, reducing von Kleintrink to fits of impotent sabre-waving fury!

Kleintrink stalemated, and angry


The flanking moves are countered

The battle was rapidly winding down, and von Krumper watched his blue-coated infantry tire and slacken as the fire wore them out. The Pilsen grenadiers still held out in Vogelhof, and von Hentsch even led a charge out of the town to rout the exhausted remainder of Dunkel’s IR7 infantry, threatening the entire line’s flank. Von Zaub had wheeled up some cannons to try and tip the balance, but when the Luftberg infantry sensed the enemy failing and counter-attacked he was rapidly forced to run them back. Von Krumper had to face it – he’d failed to break the Luftberg line and his losses were mounting fast with no prospect of a sudden breakthrough, leaving him with no option but to retreat.


The end of the battle

Vogelhof Part 1

What with the Luftberg army ready and waiting for it, it fell to Aschenbach to deploy it’s army first. Prinz von Krumper knew the battlefield was bordered by a stream, with the Luftberg army most likely to be dead ahead of him on the wider side of the field, using the rough terrain. In fact, it was likely to be entirely on the one side of the river, to prevent it being split. Deciding on a bold stroke, the talented General von Kress was given a mixed force consisting of the army’s elite infantry (the Hirschburgers & Foot Guards), some dragoons and artillery. While von Krumper engaged the enemy frontally, Kress would cross the river and fall on their flank with his elite force. The main army was drawn up in marching columns, with cavalry bulked on the right flank under the impressive von Kleintrink and the left secured against the stream.

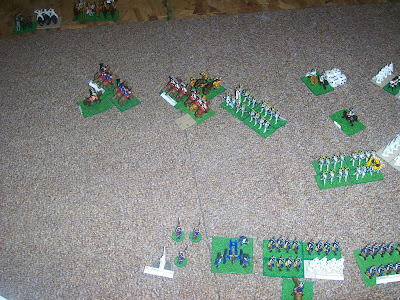
The armies deployed, Aschenbach in foreground


General von Kress with his detatchment

In response to this, the Elector Ulrich von Luftberg observed the approaching mass of bluecoats and deployed his own force as per his prepared scheme. His flanks were anchored on his right by the stream, while the left rested on the village of Vogelhof itself. These houses were occupied by the fearsome Pilsen Grenadiers, under the direct command of Conrad von Hentsch himself with orders to hold out to the death.

Vogelhof, with von Hentsch and the grenadiers (yes, I know I need to make some model houses...)

The army’s main line was drawn up in a double-line of infantry, interspersed with artillery batteries and backed by the army’s cavalry in reserve. It was a daunting defence, but as predicted the smaller side of the field over the stream was all but abandoned, save for General Figling’s Croats stationed in a wood to cover the bridge in the army’s right-rear.


The main Luftberg battle line


Map of the battle: Initial moves

As dawn light gathered the Aschenbach army approached the enemy on both sides of the river, the isolated detachment under von Kress functioning perfectly well in isolation. Sweeping on, the Aschenbach infantry on the right of their line under General Grenwitz forged ahead to attack the village of Vogelhof. IR7 von Dunkel’s men rapidly learned that grenadiers might be a tough prospect in the open, but behind stone and timber they were even more dangerous. Even forced by this to refuse a flank, the Aschenbach line swept on, folding smoothly out into line and perfectly timing it’s attack to take the initiative in the ensuing firefight. The Luftberg infantry were outclassed man for man, but with batteries of guns hidden all along their line they managed to hold their own. Everywhere, batteries of guns fired into the oncoming enemy, especially from the small wood bristling with cannon in the centre of the Luftberg line.


The infantry lines clash, as viewed from Vogelhof

General von Kleintrink had moved his cavalry forward, only to realise that with Vogelhof in hostile hands he couldn’t move ahead to turn the enemy flank. To sit tight was possibly the best course, but for Graf Erich von Kleintrink, the man who had demolished the enemy flank at Neukatzberg, such a thing was unthinkable. The only option to get at the enemy was a risky change into column, in order to slip through a narrow passage through the rocky ground east of the village. If he moved fast enough, outpacing the more sluggish enemy commanders, he could fall on the enemy’s flank and rear before they responded and win yet another battle…


von Kleintrink flanks the rocky ground


Initial combat and outflanking moves


Wednesday, July 23, 2008

First Moves


Aschenbach's army (shown in blue) was initially based in the capital of Flussburg, but an agressive advance was the most likely to be rewarding. Full of enthusiasm after Neukatzberg, Gerdt von Krumper was in no mood for sitting around. He took his full army east, intending to threaten a Luftberg advance on the capital as well as his river crossing supply source.

Elector Ulrich von Luftberg had an answer, however. Clearly, his defeat at Neukatzberg had had a salutary effect and the previous months had not been idled away with operas, gambling and reading scandalous French novels. He moved his main army north off the main approach to Flussburg, and settled into defensive positions around the small village of Vogelhof. At the same time, a detatchment of all the light cavalry under General Van Der Dijk was sent racing westwards to cut the supply route from Krumper's depot at Lauch. Unfolding with such speed that he wasn't able to respond, Krumper suddenly finds himself isolated and with serious problems.

The damnable raiding isn't helping either. No Aschenbach forage party is safe, with every farmhouse stuffed full of Croats, and every shrub concealing a squadron of Hussars. Already, forces have been melting away. Compounding the misery, even Aschenbach's slender resources for irregular warfare have been raiding away on their opponents. Before they'd even met in battle, each army had lost the equivalent of two or three regiments' worth of strength points. While the larger Luftberg army simply disbanded it's less senior regiments (IR's 10 & 11 have simply been drained for manpower and sent home to recruit for next year), Aschenbach has simply spread the pain and reduced it's infantry and cavalry regiments by a point each.

Sitting in his tent, it's clear to von Krumper that this can't go on. The longer the campaign drags by, the worse it will get - a battle is needed, and quickly, to turn things around. Scouts indicate that the Luftberg army has been preparing itself at Vogelhof, but the potential gains outweigh the risks. If the Luftberg army is defeated, it can be pushed back to it's bridgehead over the Rhine and a comprehensive victory can be claimed by Aschenbach.

The subordinate commanders are eagerly anticipating their orders of march, and surely won't be disappointed. Time to get that Cuirass polished up...

Monday, July 21, 2008

Campaign summary

So, we’ve discussed the tools of the trade for each side, now what about the job they have to do? Below is the initial sketch map I made of the Zaub family lands, which we’ll be fighting over. Generally, it’s open land with no remarkable terrain beyond some hilly areas to the south-east. The most important feature is the major river which gives the province it’s east and south boundaries, and will have to be crossed by the Luftberg army to invade. The provinces’ only major settlement is Flussburg, the provincial capital.


So, what issues will concern the armies on campaign? The first will be supply. As is fitting for an 18th Century army, it’s all by fixed depots and supply routes. Each army draws supply from a friendly city or town just over the border, which allows them to operate through most of the province. Flussburg will also be counted as a depot, so to operate fully in the province and go where they wish they’ll need to hold it. Flussburg is also pretty important in itself, as any attempt to claim ownership of the province can hardly be conclusive while it remains in enemy hands.

For the Luftberg side, the river adds another challenge. The crossing point created by the sappers will be a natural bottleneck for their army, and communication back to their home country. As such, holding it and maintaining links home will be a prerequisite of a good victory.
The other matter for each side is of course the enemy army on the loose. Winning a pitched battle against it or driving it out of the province with heavy losses will be a pretty convincing argument in your favour.

As Luftberg are the invaders, I’ll grade things from their point of view. They will get a point for each of the following:
1) Holding a route from Luftberg into the province across the river
2) Defeat the Aschenbach army in a pitched battle which involves at least 50% of it’s units
3) Capture Flussburg and hold it at the end of the campaign year.

It should be pretty easy to quantify if each objective has been met or failed. The battle victory requirement of 50% is to make sure that some skirmish isn’t taken as a decisive victory – the bulk of the enemy have to be grappled with before it counts.

Luftberg will be awarded a decisive victory if it fulfils all three conditions. Meeting two will be a major victory, and only one will be a minor victory. Anything else is a defeat, with Aschenbach winning the campaign.

Luftberg Army OoB

And now, the Luftberg army list. I don’t think I ever posted the initial OoB, as I didn’t have photos to post on the cavalry and so got held up/distracted, etc. Anyway, here is the full run-down:

Infanterie Regimenter
Grenadiers ('Pilsen' Grenadiers)
IR 1 Radetzky
IR 2 Doppler
IR 3 O'Brien
IR 4 Negrelli
IR 5 v. Trapp
IR 6 Karlovic (Croats)
IR 7 v. Stiegl
IR 8 Schrammel
IR 9 Bartok
IR 10 Hohenwerfen
IR 11 Steinkopf

Kurassier Regimenter
KR 1 Haas
KR 2 Schrodinger
KR 3 Klimt

Dragoner Regimenter
DR 1 Raab
DR 2 Krauss
DR 3 Hortenburg

Husaren Regimenter
HR 1 Rotwang
HR 2 Schiele

Feld-artillerie #1
Feld-artillerie #2
Feld-artillerie #3

As with the Aschenbach army, the artillery has been expanded to three batteries, cavalry is largely unaltered, but infantry has been expanded. IR 6 (Karlovic) is a Croat regiment of irregulars, but all others are regular line infantry regiments. Generals are:

Faldmarschall Konig Ulrich Von Luftberg (Average General)

General Conrad von Hentsch (* +1)

General La Spezia (+0)

General Figling (-1 V)

General Van der Dijk (+1)

General Kohl (+0)

General Frundsberg (* +0)

General Steinkopf (-2)

As you can see, they’re a generally poorer bunch than the more professional Aschenbach commanders, but that’s what happens when you recruit officers from a roving band of cosmopolitan adventurers. General Steinkopf, in particular, appears to be all but catatonic.

Overall, the Luftberg army has parity to it’s rival in guns, a 3:2 superiority in Cavalry, a slight edge in regular infantry, and a big strategic advantage in terms of irregular warfare (scouting, raids, etc.)

Saturday, July 19, 2008

Aschenbach Army OoB

So, how do the new and expanded armies shape up? Well, I’ve expanded the lists of each and will supply them below. Cavalry units are pretty much fixed as before, as the M&R points allow only so much to be spent on them. Infantry have undergone a bit of an expansion however, and I’ve been compelled to ditch my 16-man regiments in favour of 8-man formations. I’m not particularly happy with that, but I figure it’ll only be needed if every unit appears on a tabletop at once. With smaller battles, I’ll scale back to the preferred 16-man units.

Anyway, here’s the expanded Aschenbach OoB:

Infanterie Regimenter
Grenadiers v. Schott (‘The Hirschburgers’)
IR 1 v. Zaub Fuss-Garde
IR 2 v. Klink
IR 3 v. Grumble
IR 4 v. Hoffmann
IR 5 v. Moglich
IR 6 v. Rechnung
IR 7 v. Dunkel
IR 8 v. Grappel

Kurassier Regimenter
KR 1 v. Schnitzel
KR 2 v. Kurbitz

Dragoner Regimenter
DR 1 v. Fleiger
DR 2 v. Flunck

Husaren Regimenter
HR 1 v. Ritter

Feld-Artillerie #1
Feld-Artillerie #2
Feld-Artillerie #3

It’s pretty close to the old one, but there have been a few changes. IR 4 (Hoffmann) has been changed to a formed regular line infantry regiment, as opposed to the skirmishers of before. The newly-raised IR’s 5 to 7 are also line musketeers, but IR 8 (Grappel) is a Fusilier regiment. Cavalry is unaltered, while the artillery has been expanded to take on a third battery (as I had some spare cannons).

Officers in charge of this are listed below. To explain the system used by M&R, officers marked ‘*’ are exceptional (meaning they can act more independently) while ‘V’ means they are valorous (inspirational to troops). The number modifier represents ability, the higher the better.

Feldmarschall Prinzregent G. v. Krumper (Good Commander)

General Graf Erich v. Kleintrink (* +1 V)

General Bunzel (+1)

General Kress (* +1)

General Grenwitz (* +2)

General v. Zaub (* -1 V)

Wait a minute! What’s General Von Zaub doing at the end? Well, after his performance at Neukatzberg (and in my capacity as the Regent Von Krumper) I’ve promoted him. I also decided that if the coming war is over his family’s lands, giving him a command helps tie his family more to Aschenbach, which is probably a wise move (ah, these dynastic appointments...) IR 1 will usually be noted as the Foot Guards, but to save confusing renaming it will still be technically v. Zaub’s regiment – he’ll just be an absent honorific regimental chef. The other three generals are randomly generated, as per the M&R system.

Friday, July 18, 2008

The armies get buffed up

Her royal highness (ie, my fiancée) came down ill on the last weekend, or at least felt under the weather enough to doze on the sofa for most of the Sunday, so I had the day to my own devices. I made good use of it, by putting in a mammoth painting session which took up all the afternoon and evening (minus time to cook dinner and play the caring doctor role, naturally). I’m happy to report genuine progress!

Some of the first advice I ever got about painting figures was ‘do it in bulk.’ In other words, don’t paint a figure if you can paint a unit, and don’t paint a unit if you can paint two units. For my ongoing 6mm project, I organised out every remaining unit and stuck them down on the ice-lolly sticks I’m using as a painting mount. It’s the first time I’ve seen them en masse, and they did look very good – a genuine sense of bulk to them all. Still, as I left them with the PVA setting, I could turn my attentions to painting some 15mm.

As you’ll have seen from previous photos and posts, there is a small group of each army which has merely been undercoated up until now, and I have managed to complete all of them. The total runs to 40 Infantry figures and 16 Cavalry figures, covering various types of units and officers in both armies. On the quality scale A-Z they probably come in at around ‘U’ of something, but that wasn’t the point of it. I was aiming to do a basic paint-job, which would at least produce a respectable unit at a distance, and that’s been achieved within a single day. I’m pretty pleased, as I can finally say I’ve now got two entirely painted armies (those undercoated figures were really grating on me after a while).

I’ve based them simply enough like the others on painted card, and I just need to spread on some glue & pour on fake grass to complete the picture. I’ve also found some green card and measured out some name-labels for each regiment & commander, which I’ll be gluing to each unit’s base for ease of reference. All slightly dull perhaps, but solid and practical progress!

Tuesday, July 15, 2008

The upcoming campaign

As Stokes put it on his comment to the last posting, ‘What’s next on the imaginary front?’ Well, I’ve been pondering it for some days now, and have decided to push on with a full season of campaigning between Aschenbach and Luftberg. It seems only sensible that if Luftberg claimed the Von Zaub province only to be defeated at Neukatzberg in the fall of the year, there’s every likelihood they’d return next summer to contest the claim more fully.

There’s a single-year campaign system included in the Might & Reason rules which should be perfect to use, but there’s a few considerations to do first. The armies have been set up based on what figures I had spare, but now with M&R there is a proper points system to structure your army. I’ve been uncharacteristically hesitant to the points system, regularly talking myself down from agonizing over it with the thought “The game designer doesn’t have pages and pages of formulas and equations to work out the odds of this – he’s just used some arbitrary points system and playtested until it seemed okay!” The problem is that as it stands the points system seems massively slanted in favour of the Prussians (as Capt. Bill commented on the last post).

Want an example? I put the forces from Neukatzberg through the M&R points system to see how they shaped up, and discovered each side was underpowered. However, while the Luftberg army was at 70% of it’s powers when it was routed, the Aschenbach army was drained down to just 60% of what it should have been. In other words, even though the Aschenbach army didn’t have a single unit destroyed or even badly battered (the Grenadiers going to half-strength were the sole exception) while they trashed all before them, the M&R points system reckons they should have been even stronger, with an extra regiment or two added to the fun. I know that the learning of the rules led to some Luftberg blunders, but I really just don’t think they needed the help.

The Prussians were certainly good, but not by such a vast margin (after all, in terms of pitched battles, even a great commander like Frederick lost as many as he won.) If so, then why should we use the M&R points system with all the potential faults? I’m going to try it out for two reasons: First is that the campaign will allow the more numerous Luftberg forces to manoeuvre over a wider area and get the strategic advantages which come from having more men. The Aschenbach army may be good, but it can’t be everywhere. The second reason is that the campaign rules for commands, supply, fortresses, sieges, etc. are designed for armies sized to the M&R system. Either I conform, or have to rewrite the rules.

Many of the Austrian/Luftberg advantages seem to be ‘off the table’ such as their more numerous commands, higher ‘raider’ values, etc. The campaign will hopefully bring these out, so when the Aschenbach army next fights it’s opponents it’ll be outnumbered, weakened by supply attrition, and face a more tactically aware rival who loves broken terrain, ample reserves, and field fortifications. Certainly sounds more realistic and interesting…

Wednesday, July 9, 2008

Some thoughts on Neukatzberg

So, the first try-out of Might & Reason has been successful. The whole battle probably took about 4 hours to play out, which would have been less but for the constant pauses to read and re-read the rules. I’ve made a summary reference sheet though, which should greatly speed things in future. I’ve split the report over this (and previous posts) to post it a bit more easily, so if you’re starting to read this here – stop, and scroll down!

These things are always more informative from the losers’ perspective, so – what went wrong for the Luftberg army? Given the disastrous nature of the rout, some of the dazed survivors might be more tempted to ask ‘what went right?’ The cavalry virtually self-destructed, the artillery were galloped over by enemy horse, which left the infantry fighting alone against a full ‘combined arms’ force of the enemy. Still, the Aschenbach army’s pre-battle plan was for an outflanking move – something which quite definitely didn’t happen, and instead turned into a head-on attack. With better Luftberg handling, the whole thing might have fallen apart for them. After much pondering in the debating salons of the Luftberg capital, the following points have been singled out as the ‘big three’ lessons to learn:

Infantry can’t fight alone!
The Luftberg army advanced into the space left by the Aschenbach army’s slower infantry, which – along with the refused flank – stretched their line out to the full with only the grenadiers in reserve. In future, a double line seems obligatory. Also, as the cavalry failed to watch the flanks and the artillery was at the ends of the line, they were quickly swept away. Placing cannons in amongst the infantry seems a good option for the future, and their canister fire should help even up the firing with the enemy’s infantry.

Don’t despair over the Cavalry!
This was really down to bad luck and unfamiliarity with the rules, which meant the cavalry attacked and didn’t seek to gain outflanking advantages or any other tactical ‘edge.’ It went so badly they were routed before they could recover. It fell entirely to the reserve force under La Spezia, a deeply average commander (his stats were literally ‘+0’ which says it all, really) to hold the flank. The amazing thing is they did. By evading and flanking they managed to hold themselves together despite regularly becoming ‘Inactive’ and were just unlucky to not rout any enemy cavalry along the way. The next battle should see them perform better…

Don’t fight in the open!
Did you notice the irregular infantry in that battle? Me neither. The terrain was so open that to get cover they were in a wood off on a flank, which became totally isolated once the cavalry routed. In the history books, apparently the Austrians regularly frustrated Frederick’s plans by positioning themselves in strong positions based on rugged terrain where he couldn’t attack them (apparently he said that the Austrian Marshal Daun must have been born on a mountain, as “he had but to see one to rush up it and stay there” ). It seems a bit more notice will need to be taken of historical Austrian methods, forcing the Aschenbach infantry to struggle through rivers and woods.

The first fight was a bit of a ‘one-off’ fight, so we will presume that the struggle took place at the very tail-end of the year. For the following season’s campaign, we will have a much better idea of how to handle things.

Battle at Neukatzberg - Part 2

On the flanks, the Aschenbach right wing cavalry hurried to pull itself together and destroy the last Luftberg horse, but La Spezia’s reserve force proved to have learned from past blunders – it evaded the enemy attacks, became inactive at all the wrong moments, fluffed it’s own attacks when it did manage them on isolated units, and generally made a mess of things. However, the Aschenbach cavalry was kept thoroughly occupied and pinned down, unable to fall on the infantry’s flanks or finally scatter it’s opposite numbers, so arguably they made the bigger mess of things.

On the Aschenbach left, after some hesitating, the Graf Von Kleintrink decided to seize the moment and push on to attack. He overran the other artillery battery on the flank, but the refused infantry flank proved too much – IR Negrelli (No 4), right under the eyes of it’s watching monarch, rebuffed a charge by Kleintrink’s Cuirassiers in heroic style.


Von Kleintrink's Cavalry attacks on the left wing, going into the Luftberg flank & rear

Elector Von Luftberg (right), watches as the Aschenbach cuirassiers (left) are knocked back

In the centre, von Zaub peered through the musketry smoke and judged the enemy line to be on the point of breaking. Advancing his foot guards, he routed the infantry opposite and seemed set to turn the other flank of the Luftberg line. Even the frantic efforts of Conrad Von Hentsch couldn’t hold them firm, but the reserve regiment of Grenadiers were rushed up to counter the breakthrough. They charged into the enemy, but couldn’t sweep them back.

Conrad Von Hentsch (background) suddenly wonders why everybody round him is wearing a different colour of coat...

Another sketch-map of the major players' locations and movements

It’s guns lost, and it’s cavalry wrecked, the Luftberg army’s line now resembled a ‘question mark’ shape as it was pummelled by the enemy’s fire. By a fluke of chance, the lagging Aschenbach infantry had created a gap in the field which drew the Luftberg infantry forward into a salient, where they were getting fired on from all sides by the Aschenbach troops and their cannons, which were now unlimbered and blasting canister fire into the white ranks. It couldn’t last for long, and it didn’t. Von Kleintrink tried again on the left flank, finally routed the doughty defenders of Negrelli’s regiment and then fell on the rear of the Luftberg infantry who promptly collapsed. A glorious victory for the Aschenbach regent, General Von Krumper!


The Luftberg army faces near-encirclement before running...

Battle at Neukatzberg - Part 1

In the early afternoon, the Aschenbach army began to roll forward towards the waiting Luftberg army. As an unfortunate sign of the inexperience of all concerned, there was a breakdown of communication as the left of the infantry line began lagging behind [failed a command test to became ‘inactive’ and, through my unfamiliarity with the rules, deployed into line far too early!] The cavalry however began forging gamely ahead, including the left-flank cavalry which moved to it’s correct location but was now in advance of the army and within range of the Luftbergers.

Once the Aschenbach forces had pulled into range, the Elector Von Luftberg ordered his cavalry to attack on both flanks. The result however was a disaster, and the Luftberg horse was swept off the field by it’s opposite number [again down to my inexperience with the rules – cavalry have no resilience if you compete on reasonably even terms and then roll poorly! The Luftberg cavalry made no attempt at flanking etc. and merely crashed head-on into cavalry that had a slight qualitative edge on them to start with.] After this disaster, the Luftberg right was wide open and the left had only the reserve cavalry force under the general La Spezia to hold off their triumphant foes.

Cavalry fighting on the Aschenbach left - it's about to go very wrong...

A sketch-map of the battlefield layout

The Aschenbach infantry rolled forward to try and not get left too far behind, even their line was now squint from the left lagging behind. The cavalry on the right chased down survivors and some dragoons overran a battery of cannons on the flank of the Luftberg infantry line. At this, the Luftberg cavalry reserve sensed an easy kill and descended on the isolated Dragoons that had advanced ahead of the rest. The Elector also ordered his infantry line to roll forward, and he refused his right to counter the Aschenbach cavalry now threatening there.


Follow-up moves as the battle develops

Incredibly the single dragoon regiment didn’t evade but managed to hold off the swarming mass of attacking horsemen. Seeing the enemy infantry approach led to the Aschenbach soldiers formed into line, with the elite grenadiers and Foot-Guards slightly in advance of the rest. The Luftbergers promptly advanced on and began firing. Amazingly, IR Doppler (Luftberg IR No. 2) took on the Grenadiers and rolled three ‘6’es in a spectacular display of musketry! The fearsome Hirschburger Grenadiers were staggered and lost half of their strength in the face of this (admittedly uncharacteristic) display of firing efficiency. All the same however, the qualitative superiority of Aschenbach fire began to tell as the lines went toe-to-toe.

The Aschenbach grenadiers find they've had better days...

The firefight develops...

Battle at Neukatzberg – Camp before battle

A whole month of development, background, and horrible, shameful, peace. Time for a battle, and here we have one! I’ve been eager for some time to try out the Might & Reason rules set with the armies of Aschenbach and Luftberg, and now I’ve had a chance to do so. I decided a one-off battle to try out the system was in order. I pressed every available figure into action, quickly made name labels for all the units and officers, and used makeshift counters & dice as casualty markers. The whole thing was a little bit ad-hoc and unpolished (even taking place on some old carpet tiles for extra space) but as a learning encounter it’s been pretty useful. Over the following sequence of posts, I’ll recount the battle.

In the campaign setting, the first year has gone uneventfully for the characters – nobody died, nobody had kids, etc. I’m actually glad there were no mass deaths or anything, so obviously my Excel spreadsheet for randomly calculating deaths etc. has some worth to it. :-)

Anyway, I decided after some deliberation to begin in the thick of the action, with a border skirmish already underway between the two states. From the map, the province of the Von Zaub family are the obvious friction point, being the buffer state between the two. It’s aligned with the Aschenbach ruling house, so the calculating Elector Ulrich Von Luftberg has marched in at the head of his army to take possession. As the old king Otto of Aschenbach is far past feats of arms, his regent Gerdt von Krumper will lead out the Aschenbach army to counter them.

Using the Might & Reason system the two armies drew near and began their battle in the afternoon, which I thought might restrict the time available but actually turned out fine. The ground was generally open and flat, with some streams, villages and woods on the fringes of the action. The Luftberg army drew up in traditional style and anchored it’s right flank on the large woods stuffed with Croats for protection. With this flank guarded, the bulk of the cavalry was placed on the open left flank to counter the likely Aschenbach attack. Infantry formed up the main line in the centre, with cannon on their flanks and the Grenadiers held back in reserve to stop any enemy breakthrough. The Elector Ulrich was the army commander (naturally) while the admirable figure of Conrad v. Hentsch commanded one of the Infantry forces.

Over in the approaching Aschenbach army, General von Krumper had determined on a straight oblique attack in the traditional style, hitting the Luftberg left flank and refusing the side of the battlefield with the irregular-infested woods. The middle aged Hans von Zaub was at the head of his guards regiment, who – along with the Hirschburger grenadiers – would provide the punching power of the attack. The Graf Erich von Kleintrink was put in charge of a cavalry force, but through rolling for sub-commanders’ profiles he seemed to match best with the commander for the smaller cavalry force on the refused flank – so it turned out that a relative nobody led the breakthrough cavalry wing while the Graf sat fuming on the ‘quiet’ flank. At least, that was all the theory…


Tuesday, July 1, 2008

News Updates

As I started this about the start of June, this means I'm now writing my first post outside my inaugural month - hooray!

To all those who have kindly posted about my 6mm painting efforts, thank you very much. I'm probably degrading my eyesight at a terrifying rate, and nearly hurtled an entire regiment of Grenadiers through my TV set in sheer frustration at the fiddly awfulness of the uniforms, but somehow - I'm actually enjoying it! :-)

As her royal highness (my fiancée) has decided the loft needs cleaning out, I’m still unable to try out the Might & Reason rules. Still, as the current cleaning programme is likely to leave me with much more ‘elbow room’ for games, I’m actually quite prepared to put up with the delay. I’m less happy about my knees being red raw from all the scrambling around hauling boxes, but what can you do?

Hooray! Frederick’s first infantry regiment in 6mm is ready. Here’s a photo of them, sporting the uniforms of IR1 Von Winterfeldt. I was a bit unsure about the base, but then I’ve only seen them as an individual unit on a wood shelf. I’m proceeding on trust that when assembled en masse on a green table surface, they’ll look the part. For the photos below, I've merely placed them on an old green folder to inprove things a little.

If I may offer any word of advice, it's that the flags make a big improvement to a unit all on their own - even if they need some work to improve them (you can see my orange flag has a slight white 'edge' to it, which I'll need to paint out.)


I have a total of six Line Infantry regiments to paint for Mollwitz 2.0. Currently underway on the painting table (or drillsquare, if you will) are a grenadier unit, a Cuirassier unit, and (in the background) my army’s artillery. Pics will follow as and when the units are fit for parade.