Wednesday, December 8, 2010

Hochkirch Re-fight Pics


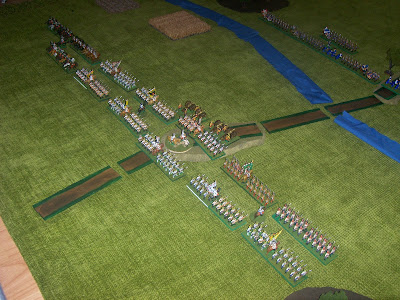
Scandalous neglect! Sadly much real-life activity plus a total lack of opportunity has kept me from playing any games for a while, but I did recently manage to squeeze a half-sized battle onto my dining table, to re-fight the battle of Hochkirch. I won't give a large or detailed description, but shall post a few snaps I managed to take. The battle proved to be a real knockabout affair, and almost all the action took place in a 2ft x 2ft area on the Prussian flank, where the Austrian columns hit. Had I known, I would've simply written off a large portion of the field and scaled-up the area of interest, but there you go - you live and learn!

The full battlefield - Prussians deployed facing to the right, while the Austrians appear at the bottom of the table.

The Austrian attack columns

The Austrian attack columns - as seen from above

The Austrians attack the Prussian line around Hochkirch village.


The Prussians held them in a hot fight for a while, but the Austrians turned both flanks and steadily overwhelmed them by superior numbers.

Monday, September 27, 2010

Moving on to the next battle

Dear god, it's been nearly a full calendar month without any postings! Whatever is going on? Well, sadly the boring real world gets in the way now and then and weekends are fully-booked, which brings all opportunity for gaming to a crashing standstill. Shame, but there it is!

I have been toying with ideas however, primarily one about doing a historical re-fight. It dawned on me that my newly-completed armies could represent very good forces in a SYW-style refight. If I doubled the scale, a very big battle!

I checked online for some scenarios, and found a bunch of them available online for free via Sam Mustafa's excellent website for his rules 'Might & Reason' (championed here on my website on several past campaigns!) The link is:


After tabling the forces and relative sizes, I realised that the Battle of Hochkirch from 1758 was a plausible candidate for my dining room table, if I halved the unit size (i.e. represented each unit with a single base rather than the normal two.) I'm currently tinkering with scales and reduced areas, plus also trying to work out how to represent the landscape on the table (it appears that the battle map was basically a large sloping hill, with around seven different contoured heights given on the scenario map.) I was planning to make the terrain by putting some books under my grass-green throw-rug, but having 7 books mounded up at one end of the table and none at the other seems a touch ridiculous! Still, I'll contrive something roughly close enough to the historical map to let the refight go ahead - after all, with time so difficult to find, no little technical problem will cost me the chance for a tabletop scrap! So far, next weekend looks free, so I'm off to polish my breastplate and have my sabre sharpened up.

Thursday, August 19, 2010

The Battle of Berkhoek


I have cracked the use of Battlechronicler, so I can now supply explanatory maps and cut down on text - always far better to get the casual blog reader to follow a battle report, I find!

The situation starts with the Aschenbach army behind the small stream near the village of Berkhoek. Their right is on a wood, while their left is near a marsh. The cavalry is on the left, while there is a small field redoubt between the cavalry and infantry to protect the line further.

The battle opens with an artillery exchange, with some troops falling on each side.


The Aschenbach line, seen from the redoubt.


The full Luftberg army, deployed in classic linear style.

The advance got underway - Luftberg planned to pin the front and quickly deliver a flanking blow with the cavalry, which would roll up the enemy line. The Right-Wing cavalry advanced rapidly, splashing through the stream in front of the enemy horse and taking heavy fire from the redoubt.


The cavalry press on and attack the enemy dragoons, flanking them and forcing them back. Elsewhere the left-wing cavalry continue to languish and make slow progress, while the infantry lines trade long-range volleys. The grenadiers push heroically forward however, showing the aggressive spirit necessary!

The cavalry battle in progress.


Presumably inspired by the example, the Hungarians cross the stream too, after the Grenadiers - one battalion of which charges and captures the artillery guns next to the redoubt in heroic style, but sadly the redoubt's defenders make further advance impossible without exposing their flanks to deadly fire. Where are the cavalry - they're surely meant to protect against this sort of thing!

The infantry lines stutter forward towards each other, with battalions being repeatedly halted in disorder by the hot fire. Aschenbach is naturally doing better here, outshooting it's more poorly-drilled rivals.

Aschenbach's line is straining as the casualties mount, but the reserve Fusilier battalion from the depot in the rear finally arrives to help out. Likewise, a battalion of IR7 refuses the flank to keep the line together.


At last! The left-wing cavalry finally roll an excellent move and ford the stream, heading deep into the enemy rear. The right-wing cavalry are stalemated, and a second attempt by the grenadiers to charge some cannons is halted in a storm of grapeshot. The line is holding, but only just - and there's nothing left to stop this cavalry attack threatening to descend. Von Hartling decides to withdraw slowly, hopefully avoiding the enemy cavalry before it can get a successful orders roll. Disaster strikes however, when Von Hartling completely fails his own orders roll - his army is a sitting duck!


Nooo! The cavalry commander on the Luftberg left wing gets the second full-effect orders roll - two turns in a row now! This incredible streak of form sees his horsemen descend onto the backs of the hard-pressed bluecoats, who promptly shatter like glass.


The disaster is total - two battalions are scattered, while a third is surrounded along with the surviving gunners. Caught deep within the milling hordes of Luftberg troops, there's nothing for it but to send out a white flag and begin the genteel process of negotiating an honourable surrender. Von Hartling does however use the time for this wisely, snatching his remaining infantry clear of the wreckage, abandoning the redoubt and falling back behind his cavalry as a screen.


Gentlemen, another glorious victory to the Elector Von Luftberg - champagne!


Tuesday, August 17, 2010

Technical Problems

Apologies for the delay, everybody. The battle is fought, but I am intending to post photos & the report along with maps using the Battlechronicler software - worth googling as it's a free download for your wargame maps etc. to put on your blog. Only problem is that I'm still going through the 'teething troubles' stage, getting the hang of how to use it. The results should be along soon, hopefully, so please bear with me!

Friday, August 6, 2010

Up-and-coming Fight


Thanks to everyone who commented on the last post - my long-held objective is complete! And now, with perfect timing, the Muckenmire campaign has thrown up an interesting (and large) battle.

Winter approaches, so both sides are largely clearing up the province by engaging in the time-consuming and static pursuits of siegecraft. Von Krumper is now camped outside Veldhuizburg, Von Zaub is away investing the large and isolated city of Oosterheide, and Von Hartling - well, it's not going so well. After entering the province and sweeping a few towns away from the enemy, the dire autumn weather forced a halt and consolidation, building a depot to let him move deeper into enemy territory. Upon completion, he crossed the river Konigveldt and approached the garrisoned town of Vincken for a siege. Sadly for him, there was a late-freeze in November that restored full-speed movement in the province before the serious winter snows set in. With the roads passable, no less a force than the Elector Von Luftberg's army itself (newly arrived in the province and looking for trouble) began approaching fast.

Keeping up the siege was impossible, and hasty withdrawal to the Konigveldt river the only option. However, Von Hartling wasn't about to give up without a fight. The road back to the river is one of 20 miles, but two-thirds of the way back the road is hemmed in - by woods and the river to the north-west, and swampland to the south-east. At this bottleneck, the outnumbered Aschenbach army can make a stand and hopefully bloody the noses of the Elector's men.

Forces are as follows below. The Aschenbach army has every advantage of terrain and position, but is heavily outnumbered: parity in artillery, but facing odds of two-to-one in Infantry and three-to-one in Cavalry.

Aschenbach - Von Hartling commanding
IR4 Von Hoffman Infantry Regiment
IR7 Von Dunckel Infantry Regiment
FR8 Von Grappel Fusilier Regiment (one battalion late-deploying)
DR1 Von Fleiger Dragoon Regiment
#2 Artillery battery
Rudimentary fieldworks

Luftberg - Von Luftberg commanding
Pilsen Grenadier Regiment
IR2 Doppler Infantry Regiment
IR5 Von Trapp Infantry Regiment
IR7 Von Stiegl Infantry Regiment
IR9 Bartok Hungarian Infantry Regiment
KR3 Klimt Kurassier Regiment
DR2 Krauss Dragoon Regiment
HR2 Schiele Hussar Regiment
#1 Artillery Battery
Siege Train (not on field)
Pontoons (not on field)

Monday, August 2, 2010

Painting: Completed!


It's done! In a post I sometimes never thought I'd type, here it is: I have completed my Seven Years' War armies! First conceived in 2008, and now - roughly one and two-thirds of a year later, they are now completely painted and based. I had thoroughly sickened myself of painting after an earlier burst that broke the back of them, and allowed me to play games with a few left over - I just couldn't face mopping up the remainder. Little bits were done here and there, slowly nibbling away at the pile, but that was all.

Then, yesterday morning, I suddenly had the impulse out of nowhere to just get my head down and finish it off. One lazy Sunday transformed into a frenzied paint-a-thon later, and it is over. The final Aschenbach units are complete, painted and based!

Doubtless when they make the film of this deranged painting project (it's all in my mind's eye, so why not?) I'll be on-screen looking all windswept and conflicted, trying to decide whether to go back for one last mission(painting session) before final retirement. I'll be living in some log cabin in the mountains, where I've no doubt sought refuge from the horrors of the war(gaming.) I'll tell my boss(conscience) that I'm through with it - I'm out, and have no more interest in coming back. He'll tell me that if I don't do it, nobody else will - and, just before he walks off to leave in his jet-powered helicopter (yes, he has one of those) he tosses a single, battered figure at my feet. I look down, and pick it up: a Prussian Musketeer, Advancing (Catalogue Number SYWP1 , Essex Miniatures.) Slowly clenching it in my fist, perhaps delivering a skyward shout to the uncaring gods, I know that once more I'm back in the game, damn them. Just when I thought I was out, they pull me back in... They pull me back in...

In retrospect, I probably need to go have a bit of a lie down! Ponder all the games to come, and all that! :-) Here's some eye-candy of the second army.


Cavalry above - Cuirassiers & Dragoons

Generals & Grenadiers


Fine regiments of Infantry, Grenadier mitre-caps shining in the foreground


Infantry in foreground, plus Fusiliers and Hussars behind

The Artillery


Meet Otto - the flag-bearer in IR7 (Von Dunckel) who enters my personal painting valhalla, as the very final figure based out of the approximately 719 painted and based to complete this project.

(Also, Thanks to all who ever read the blog or posted on it over the long struggles with kind words of encouragement - it made a big difference!)

Thursday, July 29, 2010

July activity

Where does the month go? I've been busy with much 'real life' stuff, plus when I have been able to progress with the Muckenmire Campaign, it doesn't immediately generate any action - curses on this muddy weather, slashing everybody's movement! Still, even with this delay I believe a big battle could be soon approaching, as Elector Von Luftberg himself has arrived with his army of reinforcements.

More generally in the hobby, I have been listening to the excellent 'Meeples & Miniatures' podcasts, which I would recommend to anybody with iTunes and (like me) has a long-ish commute each day to and from work. They basically just ramble on over any topic that takes their fancy on wargaming, and the result tends to be very entertaining. A recent discussion was on the board game 'Commands & Colours: Ancients' which I haven't played in ages. There was discussion of period variants, plus the way that numerous gamers had converted the game from a card board and wooden counters into effectively a quick-play wargame with miniatures. My interest has been tweaked - I may have a root around for a SYW-version I can use my miniatures with. The ability to fight a decent wargame-like battle on a limited-size board and complete it in 60-90 minutes would be a nice 'filler' game, so we shall see!

Monday, July 19, 2010

Highway Robbery!

Taking up the action just south of Veldhuizburg, I laid out a large map area for just two cavalry units a side to fight out a large-scale skirmish on - the Luftberg cavalry of one Dragoon and one Hussar regiment making their escape south down a road, while the Aschenbach cavalry of one Cuirassier and one Hussar regiment dash to stop them.


The Luftberg cavalry crosses the Schelve and heads south down the road (bases turned sideways as they're in column.)


Oncoming Aschenbach cavalry races in from the east (partially obscured by the mist. Some would say the camera didn't focus, but what would they know?)


The Aschenbach cavalry moves fast, and manages to cut the road in front of the Luftberg column, just next to a small cornfield.


Luftberg hurriedly deploys, and the Dragoon regiment steps sideways onto a little rise of ground nearby.


The Hussars and Cuirassiers clash, with the heavier troopers winning and the Hussars falling back.


The opportunistic Dragoons charge down onto the flank of the tired Curiassiers and send them reeling back in disorder through the crops. A stand-off ensues, with each side rallying as best as they're able. Luftberg eventually moves it's Hussars off southwards, behind the Dragoons.


This leads the mobile Aschenbach Cuirassiers to swing round the revealed flank and hit the Dragoons again - it breaks them, sending the broken remains fleeing south.


And with that, the fight is over! Luftberg's cavalry slip the noose and escape being penned up in the siege, but in doing so their Dragoon regiment has been routed by the enemy. Plaudits all round! I'd recommend trying this as a quick skirmish battle - I actually used a playing area large enough for both my entire armies, so moves had to be carefully thought through to prevent the four units I actually used just slipping past each other. The Black Powder rules also worked very nicely, with lots of flanking and reforming: just what you'd expect from a cavalry battle.


Saturday, July 10, 2010

The Cavalry Trap


The action converges on Veldhuizburg now, as autumn draws on and a crossing over the Schelve becomes the principal prize for Aschenbach arms. Bitzhelm is well prepared for defence, with one of his remaining Infantry battalions in the works for defence, while his still-numerous cavalry (which never really got into action at Dolderburg) are also close at hand in the surrounding countryside.

The Aschenbach General Grenwitz has approached south on the Dolderburg road, and has commenced siegeworks with camps, parallels, etc. However, on his own he lacks the numerical strength necessary to properly seal up the town, and so his ineffective works can only screen the eastern approaches. In the west the land is still open and teeming with squadrons of the rival cavalry, who spend days in running skirmishes - Aschenbach trying to contain the besieged
close in to the works, while Luftberg tries to constantly break through the cordon and raid out on the supplies trundling down the Dolderburg road to Grenwitz's troops.

Miserable stuff for the besiegers, being thwarted like this. Von Krumper's approach gives cause for hope, however. He'll bring the numbers needed to clamp the western areas shut and
allow the siege proper to begin. However, Veldhuizburg - with it's back to the Schelve - is still not quite trapped thanks to the bridge Southwards. As Bitzhelm's Infantry fill the Garrison to capacity, the Cavalry will simply pull out southwards over the river. Grenwitz has plenty of time to ponder all this, at great length, and devises a suitably inventive plan.

He writes to Krumper, explaining the problem and suggests the following: As Krumper approaches to within a few miles of the scene, he sends his pontoons southwest to the Schelve and gets his Cavalry across, with orders to cut the Road and bottle up Veldhuizburg from the south. This way the garrison will be overloaded with useless Horsemen when Krumper's troops finally lock down the siege with a full investment - which will probably result in Veldhuizburg's rapid fall through starvation through the excessive pressure on the supplies.

Krumper decides to risk it - a cavalry-heavy fight beckons, as once his pioneers are spotted at work the Luftberg cavalry will struggle to disengage in the fields west of Veldhuizburg, fall back through the town, and then escape down the South road. Failure will probably doom Bitzhelm's whole force to siege & surrender, while failure risks a prolonged siege against a small rearguard which could well bring disaster if Aschenbach tries to persist with it through the rapidly oncoming winter.

Wednesday, June 30, 2010

Veldhuizburg

I've had a moment of creative diversion that I thought I'd share. As the campaign focus moves to the river-crossings of Veldhuizburg on the River Schelve, I found myself sketching out maps for the small city/large town of Veldhuizburg. Here's a plan of the place:


It sits on the NE bank of the river, with a bridge across to a small (unwalled) docklands area on the opposite bank. Surrounding terrain is generally low-lying with scattered woods and marshland. I've also wound up doing my model in 3-D, and here's a view below:


As you can see, Veldhuizburg has a bastioned wall around it's perimeter, designed in accord to the scientific principles of the age. There are no ravelins around the works however on account of the relatively smaller size of the fortifications (outworks cost money, you know - do you fancy writing to the Elector about it, mister Burgomaster? I thought not!) The ditch in front has been cut into the river Schelve to create a moat around the walls, and a small Glacis to the front has been made by mounding up the sandy soil into a ramp (presumably, the money for Ravelins is taken up in paying some poor devils to constantly shovel the sand back into place and prevent the whole place slumping down!) The town layout is also on the classic Dutch fortress-pattern of streets radiating out like spokes from a central assembly area, allowing the garrison reserve to reach any point on the walls swiftly. On a whim, I made the central area a grassy little quadrangle to serve as the garrison parade-ground, town market, or promenading gardens for the well-to-do.

[Just as an extra note, I should add that the whole thing was drawn up easily on Google Sketchup, the free download for drawing 3-D pictures you can obtain, and can be used even by untrained amateurs like me!]


Wednesday, June 23, 2010

Rain in Muckenmire


Wouldn't you know it - after much delay in the real world, the exact thing happens in the 18th-Century world! Aschenbach's campaign of invasion into the province of Muckenmire has been hit by a most inconvenient spell of bad weather. The normally hot august weather has been ruined by some unexpectedly heavy rain, which has turned the entire theatre into a muddy, shapeless mess.

Fresh from his bloody nose at the Steenwijk, the stunned Von Krumper has taken stock and called for a re-concentration of his forces, with the aim of taking Veldhuizburg further up the River Schelve and obtaining a crossing to the southern bank. If the capital of Brederdam can't be taken by a direct approach, it can be cut off and encircled from the rear! Veldhuizburg is also an easy target on account of the only defenders being the Luftberg army under Von Bitzhelm, still recovering there from their earlier defeat at the hands of Von Grenwitz.

Only a small holding force under Tobias Ludwig stood in the way, with his small detachment of Luftberg infantry & cavalry dug in at the Katherijne Bruck bridge over the Langendijk canal. He should have been brushed aside by the main Aschenbach army, except - he wasn't. The Aschenbach troops never even made it there. Thanks to this foul weather and trying to haul a siege train through it, the attack slowed to a crawl and never even landed a blow. In fact, the closest thing to action all month was when Von Krumper ordered the depot for his aborted advance to be torched - the first time for weeks anybody in a blue uniform has felt warm!

Enough of this miserable trekking around. Time to go to your billets in a handy requisitioned farmhouse, hang up your gaiters by the fireside, then engage in some drinking, gambling and pipe-smoking for a few days until the rain lets up.

Monday, May 31, 2010

Plans for Progress

Hello Everybody, and sorry for the (relatively) long time since posting. The real world will have this way of demanding attention! Anyway, I thought I'd check back in with my Wargaming doings.

A few weeks back I hit on the idea of keeping a hand-written, pen & paper record of the campaigns I was running. This has been adopted for a few projects of mine, which at present stand at the Aschenbach/Luftberg campaigns (fully detailed here, obviously), a refight of the Wars of the Roses (covered on my other blog), a fictional-setting American Civil War campaign (also on the other blog) as well as a planned Sci-Fi Campaign (not blogged at all, but a lot of groundwork getting done!) All this is pretty busy stuff, and I find it takes up a lot of time. However it's a lot of fun and highly rewarding, plus it carries two advantages which are not instantly obvious.

First is that the written record performs much like the blog on a specific topic - it makes you regularly act on it! Most wargamers will, I believe, only have a general-purpose wargaming blog and while this compels them to wargame if they want to keep posting, they can flit from idea to idea/project/scheme at will, and so a few can fall aside. By writing it out as a dedicated record, you're likelier to keep at it!

Second is that while all this has made my work slower and progress more gradual, it has made it far better. Take Aschenbach & Luftberg, for example: I fought out and posted on the Battle of the Steenwijk recently, and haven't done much since due to other projects getting in the way. It used to be this would mean forgetting what was happening & losing interest, or having to stick with something when my attention had moved elsewhere temporarily, causing irritation & more loss of interest. As it is however I opened my Campaign journal and found an instant reminder of where every battalion was and what each commander was doing, so I instantly resumed the story from where I had left off.

Anyway, I feel a small announcement is in order to mark the spectacular victory gained by Luftberg over the Aschenbach enemy that has triumphed more often than not in pitched battles. The Elector Von Luftberg finally has a subordinate who can win clear-cut victories in the field against the enemy king, which is no small matter. As such, the Elector of Luftberg has announced that Felix Von Hentsch is to be promoted to a Marshal of Luftberg, and issued with a jewel-encrusted baton immediately so as to display his prestigious new rank. Sadly the expense of the jewelled baton means reinforcements will be a bit delayed, but no doubt Marshal Von Hentsch will understand...

Wednesday, May 12, 2010

Anyone know about this?

Hello all - for the first time in months I'm posting this on a desktop PC, since my last one had a meltdown and I was forced into my 'lifeboat' of a laptop to keep using the internet! The newly-established PC has the game-managing software 'Steam' on it, and it threw up a rather interesting hit when I browsed about in the store...

Does anybody know about the game 'Rise of Prussia' by Paradox Interactive? I had heard about their previous games, set in the American War of Independence, but this was something of a new discovery for me. (Apologies for no link, but I haven't quite got the knack of it yet for postings!)

Anyway, I thought I'd point it out as it's been out for about 2 months and I had heard nothing about it anywhere - I imagined a strategy game about continental Europe in the SYW would be of interest to some, and so thought I would point it out!

Saturday, April 24, 2010

The Battle of Steenwijk


Time for the big push, as Von Krumper crosses the Noordschelve river to put himself on the same bank with the Luftberg army, beat it, and then be in the provincial capital of Brederdam by dinnertime. A long month of buildup has seen him leap into motion, with the river carefully surveyed for crossing points and the pioneers prepped with a bridge of boats to make the move. All this preparation didn't go unnoticed by the enemy however, so by the time the bridge was assembled the Luftberg army under Von Hentsch was ready and waiting, with a cordon round the expected bridgehead. Von Krumper selected a crossing near a small tributary waterway, the Steenwijk, which formed a bell-shaped enclave which could be easily defended from counter-attacks.

Von Hentsch planned to have his infantry and artillery on some low rises back from the river as his apparent main line, but this was all just a lure. With the Aschenbach troops drawn on, hopefully with their right flank in the air, the Luftberg killing blow could descend from his left wing, a regiment of Cuirassiers and another of Dragoons, along with a full regiment of infantry.

Things start well enough with the columns of Aschenbach infantry crossing over, led by a screen of Hussars and then the Grenadier Guards in the lead.

Like clockwork! The infantry cross over and deploy into two lines of a regiment each, plus a battalion in reserve. The only disruption comes from the odd long-range cannon shot and the crackle of musketry from the Croats and irregulars in a small copse over the Steenwijk.

Devil take the hindmost! The lead battalion of Grenadier Guards takes it's orders to full execution, powering on ahead to tackle the enemy line with no thought to the slow and careful deployment behind in the main body. Boldness or Rashness? Time will tell, although the Luftberg line is rattled as Schrammel's infantry regiment takes a pounding.


The hussars try and drive off some Croats to their front, occupying a small bit of woodland. Sadly the Croats prove infuriatingly effective, raining a constant, debilitating fire onto the horsemen and also into the flank of the infantry from across the Steenwijk. Such disorder is intolerable! The Aschenbach deployment out of the bridgehead starts to struggle.


And then, the cavalry are loosed! The two battalions of Cuirassiers charge, supported by the Dragoons, and sweep into the flank the blue infantry were about to occupy. The Hussars, milling about in front of the Croat-filled wood, are sent bowling back and the horsemen crash into the lines of infantry battalions, causing mayhem. Even the king Von Krumper himself gets a nasty scare as squadrons suddenly bear down on his command post!


With all the attacking weight being taken by the cavalry across those flat, marshy fields, the Luftberg infantry struggles to keep pace with the fight. Still, the Grenadier Guards are taught caution by letting themselves get flanked and hit in the front by musket and cannon fire. (When will these damned Grenadiers stop rushing headlong into trouble?!)


Vexed with shot! The Aschenbach infantry units pushed back into the bridgehead find no respite to reform, thanks to the skirmishing fire of crack-shots across the stream. The bluecoats volley back, but it's pretty ineffective and saps the strength now needed to hold off the Luftberg cavalry.


The battle in full swing. The Grenadiers manage to pull themselves back from the tip of the breakout, while the infantry battalions wheel round to fire on the horsemen trying to form for another charge. Both armies have now ended up turned through 90 degrees, fighting at right-angles to their artillery lines. The gunners on both sides of the river send shots ploughing lengthwise down the lines of infantry and cavalry alike. Can nobody get any elbow-room to move around here?


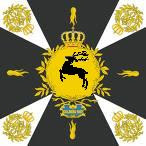
Realising drastic action is needed, Von Krumper calls across his reserve regiment of cavalry from the far bank to try and counter the Luftberg horse. They make it over, but fail to deploy out of column. Desperate to give them some protection and win some room to deploy, he is forced to commit his last untouched reserve unit - the second battalion of the Foot Garde. The grenadiers follow their black-and-yellow regimental banner forwards and fire volleys into the disorganised Luftberg Cuirassiers, buying the Cuirassiers the protection they need.


The Luftberg horse falls back, a spent force. None of the four battalions have been broken, but each one has three hits marked on it and all are disordered. In other words, they're blown, exhausted, incapable of further offensive action. Why, my little nephew Otto could ride them down on his hobby-horse! However, several battalions of Aschenbach infantry have broken up under the charges, the slowly tightening arc of whitecoat infantry, and (above all else) they can't get any peace to recover from disorder or casualties thanks to the endless lashing fire of the irregulars across the whole bridgehead


Losses are heavy for Aschenbach, and many of the remaining units are badly shaken and set to rout if pushed hard. Von Krumper has had enough of this grim field, and orders a withdrawal. The Cuirassiers trot back across, never used in the day's fighting. Following them come several shaken battalions of infantry, glad to get across to the friendly shore. Last out are the hussars and the Grenadiers, forming a tough rearguard that proves off-putting enough for the exhausted Luftberg infantry to fail to pursue. A dejected Von Krumper recrosses the Noordschelve from his untenable bridgehead, the breakout a failure. The poor fellow seems stunned by the calamity!

Over at Felix Von Hentsch's headquarters, it's celebratory schnapps all round! The enemy have lost three out of their seven infantry units and failed to get across the river. Rarely has there been such a spectacular and crushing defeat for Von Krumper, and this represents a personal triumph for Von Hentsch - now in the glory of his greatest and most clear-cut victory!